While my last set of self-portraits as Asteria went well, I wished to redo the images with the camera closer to myself in order to retain as much quality as possible for when I print. As I aim to print (currently) at the size of John William Waterhouse's original painting The Charmer (1911) at its original size of 97 x 61cm, I would like to have the images of high quality so they still look good when printed at this medium size.
For this shoot, I kept the location the same (in Holywells park), and used the same D810 camera, props and costume. I changed the lens to one that has more zoom capability, a 70-200mm, in order to make me fill more of the image without having to crop it in post-production. A lot of these images were therefore taken at 100mm.
The first image diverts a little from the original painting as I as the subject am looking at something in the distance rather than something in the water as Asteria is.
The angle in both is also slightly different as it's not as straight on to the side profile as the painting, however, I don't mind this as I am using the painting as a reference and guide for my images and not so much an exact replica. I still think that this image has a strong connection to Waterhouse's painting in terms of colour, pose and scene. Perhaps most noticeably different is my hair which is much more pronounced than Asteria's hair in the painting. I have yet again chosen to make this a key feature as it is one of my most defining elements of what makes me, me. Most of my life I have been defined by my hair and I have learnt to embrace that rather than be offended.
Like the previous shoot I have done on Asteria, these images have a sense of modernity that comes from the costume and the media (photography) used, and that mixed with the prop of the lyre and the lack of technology in the background makes for a very interesting collaboration between reality and fantasy.
In terms of editing, I very much used the same techniques as before in order to create a strong image.

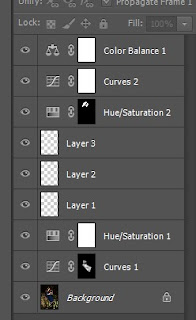
I first adjusted the curved in order to give the dress some more brightness, matching the original painting a little better. These curves were painted on using a mask, allowing me to build up the density of the curves as I needed, which therefore gave me more control over the definition and detail of the dress, creating shadows and highlights for more depth. I then adjusted the hue and saturation in order to tone down the intensity of the colour, as to not distract from the rest of the image.
After that, I did some skin adjustments in order to give the image a tiny bit more of a painterly feel and to make the area as clear and defined as possible. By using the brush tool with my skin tone, I was able to smooth out the skin and minimise any grain that would be present in the face from shooting at night.
After these adjustments, I used another hue and saturation layer in order to bring some vibrancy to my hair and then added a curves layer to make the contrast stronger every so slightly. Lastly, I used a colour balance layer to bring some cool tones back into the image, as I could see them in Waterhouse's painting within the rocks and greenery.
Overall, I'm very happy with this shoot. It was more a case of perfecting the previous one, and the progression from my first effort to here is something I am proud of. Using references to painting as been a great help and has motivated me to continue creating.
By reshooting and not having to crop the images in, they will be able to be printed to a higher quality than the shoot before, which is what I wanted.
For this shoot, I kept the location the same (in Holywells park), and used the same D810 camera, props and costume. I changed the lens to one that has more zoom capability, a 70-200mm, in order to make me fill more of the image without having to crop it in post-production. A lot of these images were therefore taken at 100mm.
The Charmer, John William Waterhouse (1911)
The first image diverts a little from the original painting as I as the subject am looking at something in the distance rather than something in the water as Asteria is.
The angle in both is also slightly different as it's not as straight on to the side profile as the painting, however, I don't mind this as I am using the painting as a reference and guide for my images and not so much an exact replica. I still think that this image has a strong connection to Waterhouse's painting in terms of colour, pose and scene. Perhaps most noticeably different is my hair which is much more pronounced than Asteria's hair in the painting. I have yet again chosen to make this a key feature as it is one of my most defining elements of what makes me, me. Most of my life I have been defined by my hair and I have learnt to embrace that rather than be offended.
Like the previous shoot I have done on Asteria, these images have a sense of modernity that comes from the costume and the media (photography) used, and that mixed with the prop of the lyre and the lack of technology in the background makes for a very interesting collaboration between reality and fantasy.
In terms of editing, I very much used the same techniques as before in order to create a strong image.

I first adjusted the curved in order to give the dress some more brightness, matching the original painting a little better. These curves were painted on using a mask, allowing me to build up the density of the curves as I needed, which therefore gave me more control over the definition and detail of the dress, creating shadows and highlights for more depth. I then adjusted the hue and saturation in order to tone down the intensity of the colour, as to not distract from the rest of the image.
After that, I did some skin adjustments in order to give the image a tiny bit more of a painterly feel and to make the area as clear and defined as possible. By using the brush tool with my skin tone, I was able to smooth out the skin and minimise any grain that would be present in the face from shooting at night.
After these adjustments, I used another hue and saturation layer in order to bring some vibrancy to my hair and then added a curves layer to make the contrast stronger every so slightly. Lastly, I used a colour balance layer to bring some cool tones back into the image, as I could see them in Waterhouse's painting within the rocks and greenery.
Overall, I'm very happy with this shoot. It was more a case of perfecting the previous one, and the progression from my first effort to here is something I am proud of. Using references to painting as been a great help and has motivated me to continue creating.
By reshooting and not having to crop the images in, they will be able to be printed to a higher quality than the shoot before, which is what I wanted.
Asteria Shoot 3
 Reviewed by BethCorbett
on
March 13, 2020
Rating:
 Reviewed by BethCorbett
on
March 13, 2020
Rating:


No comments: